
Designing ADA-compliant commercial bathrooms is not just about being compliant with the law—it’s about designing the space to be accessible, dignified, and safe for everyone who uses it. Effective commercial restroom design requires accessibility to be coordinated with fixture placement, clearances, plumbing, circulation, and long-term facility use. Detailed ADA accessible bathroom layout planning can help project teams coordinate turning space, fixture placement, circulation, and other accessibility requirements before construction. Even experienced architects, contractors, and facility managers can make minor design or installation errors that leave a space non-compliant. These errors can lead to costly retrofits, liability problems, and accessibility barriers for people who rely on these spaces every day.
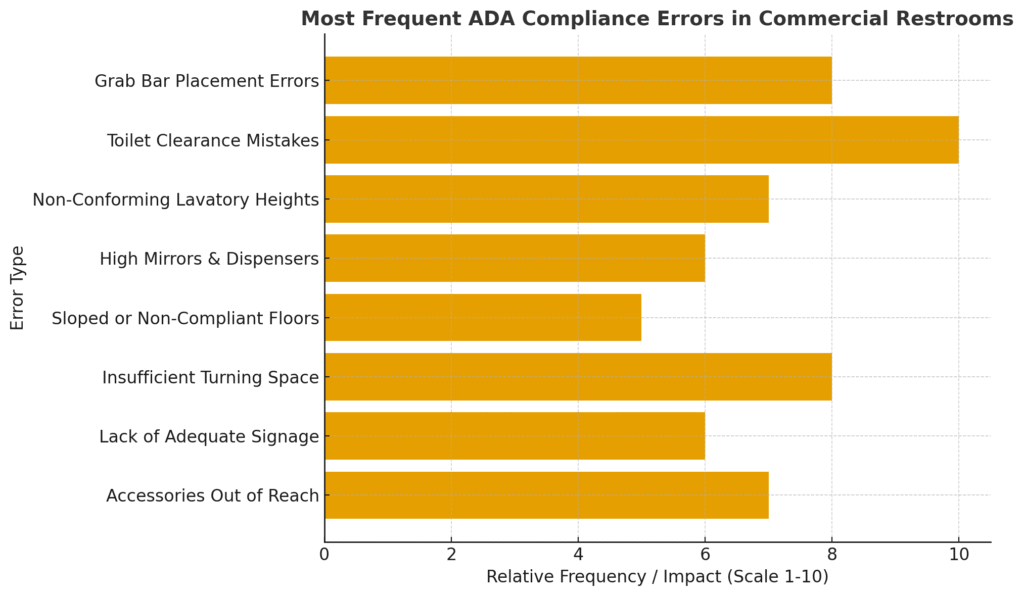
Following are some of the most frequent ADA compliance errors in commercial restrooms, why they happen, and—most importantly—how to prevent them.
Following are some of the most frequent ADA compliance errors in commercial restrooms, why they happen, and—most importantly—how to prevent them.
Grab Bar Placement Errors
Grab bars are one of the most important accessibility elements in any commercial restroom, but their location is frequently misunderstood. The ADA Standards (Sections 604.5 and 609) mandate precise measurements:
- Behind the toilet: A horizontal grab bar not less than 36 inches long shall be mounted 33–36 inches above the floor.
- Beside the toilet: A 42-inch long bar shall be mounted on the nearest wall to the toilet, also 33–36 inches above the floor.
One of the usual errors is adding center bars to the fixture rather than installing them in line with wall and floor measurements. Another error is installing decorative or thin bars that can’t support 250 pounds of pressure, which is what’s required.
How to avoid: Always measure from completed wall and floor, not from construction trim dimensions. Double-mount surfaces to bear necessary load, and double-measure installation heights after tile or wainscoting has been installed.
Toilet Clearance Mistakes
Toilet clearance is probably the most common ADA trap. Wall-hung toilets should be a minimum of 60 inches wide and 56 inches deep (59 inches for floor-mounted). The toilet’s centerline should be between 16–18 inches from the nearby wall. For additional guidance on required dimensions and spatial planning, review these ADA restroom design fundamentals, clearances, and sizes.
Designers commit this blunder when they install wall finishes or partitions, and a foot or two of clearance is lost—enough to make the restroom non-compliant.
How to avoid: Include all wall treatment (partition thickness, tile thickness, backing board) in initial design. Use field templates before partition locations are determined, and locate accessories like toilet paper dispensers so that they do not project into the clear floor space.
Non-Conforming Lavatory Heights and Knee Clearances
Lavatories are also a cause of ADA mistakes. The top of the sink should not be more than 34 inches above the ground, and there should be a knee space of at least 27 inches high, 30 inches wide, and 19 inches deep under the fixture.
Problems arise when designers use standard vanity cabinets or decorative panels intruding into knee space. Additionally, plumbing under sinks is typically designed as exposed and therefore become burn sources.
Avoid it by: Using wall-mount sinks that are ADA compliant. Check finished floor measurements, not the rough-in height. Insulate hot water and drain pipes always or use covering guards to meet safety requirements.
Insufficient Mounting of Mirrors and Dispensers
Mirrors and dispensers are mounted too high in most cases. ADA code prescribes the lower edge of the reflective surface of mirrors to be not greater than 40 inches from the floor, and dispensers of soap or paper towels to be no greater than 48 inches from the floor and not greater than 4 inches deep if they are installed within a reach range.
When mounted over countertops, these dispensers should be even lower—far too frequently an afterthought in hurried installations.
How to avoid it: Use mock-ups in installation. Use actual wheelchair reach ranges to provide access. Use recessed or semi-recessed dispensers to minimize depth and meet the 4-inch projection requirement.
Sloped or Non-Compliant Floors
Toilet room flooring must be firm, stable, slip-resistant, and nearly level. But designers all too often design too steep a slope for drainage—especially in showers or wet areas. ADA limits slope to 1:48 (about 2%) in accessible routes, e.g., floor routes from entrance to toilet and sink.
How to prevent it: Strategize with floor installers and plumbers ahead of time to offer both drainage and access. Install linear drains and slope them gradually to satisfy requirements without puddling or extreme changes.
Insufficient Turning Space and Door Clearance
Wheelchair users need a minimum of 60 inches of turning space or a T-shaped space to be able to turn in bathrooms. Designers will take this for granted when they put in trash cans, baby-changing stations, and other objects. Doors that open into clearance spaces also compromise accessibility standards.
How to avoid: Design door swings and fixture placement in 3D. Include out-swinging doors or pocket doors if there is limited space. Routinely check that movable objects—such as waste can or accent furniture—are maintained outside of required clearances.
Lack of Adequate Signage and Visual Accessibility
ADA compliance extends far beyond physical design to include signage and visual accessibility. Restroom signs consist of raised lettering and Braille, located on the latch side of the door, between 48 and 60 inches from the floor.
Incorrect practices include hanging on doors or using fonts and colors with no contrast.
How to prevent it: Employ ADA Section 703 tactile and visual character requirements. Install matte, high-contrast signs in sans-serif letters with easy-to-read letters. Symbols and letters in family or unisex restrooms must be compliant with present state and federal accessibility amendments.
Not Taking Into Account Accessories and Reach Ranges
Finally, the majority of bathrooms also fail ADA testing because of small but important accessories: hand dryers, coat racks, shelves, or paper towel dispensers placed out of accessible reach distances. Wheelchair users can only reach as far as 48 inches forward and 54 inches side reach.
How to prevent it: Develop a thorough accessory mounting schedule in your construction documents. Apply adjustable-height dispensers wherever it is feasible and check all mounts on punch-list walks.
Field Verification and Construction Coordination Mistakes
ADA restroom compliance should not be treated as complete simply because the architectural drawings show compliant dimensions. During construction, relatively small changes in wall thickness, tile buildup, partition locations, plumbing rough-ins, fixture models, door hardware, and accessory placement can reduce the usable clearances that were originally established during design. A restroom that appears compliant on paper can therefore become non-compliant after finishes and fixtures are installed.
One frequent coordination mistake is relying only on nominal dimensions rather than measurements taken from finished surfaces. Wall tile, backing material, decorative panels, plumbing enclosures, and partitions can each reduce available clear floor space. Final dimensions for toilet centerlines, lavatory knee clearance, maneuvering areas, reach ranges, and accessible routes should be verified after the relevant finishes are installed.
Fixture substitutions require the same level of review. A replacement toilet, lavatory, faucet, soap dispenser, hand dryer, mirror, or partition may appear functionally equivalent to the originally specified product but have different dimensions, mounting conditions, projections, or service requirements. These differences can affect accessible clearances and the relationship between adjacent fixtures. Product substitutions should therefore be reviewed against the coordinated restroom layout before installation rather than approved solely on appearance or general function.
Plumbing and electrical coordination is particularly important below accessible lavatories. Traps, supply lines, valves, power supplies, sensor control boxes, protective covers, and other service components should not interfere with required knee and toe clearance. Maintenance access should also be considered so future servicing does not require permanent obstructions within accessible areas.
Doors and wall-mounted accessories should be included in the same final field review. Door swings, closers, handles, toilet-paper dispensers, soap dispensers, hand dryers, mirrors, shelves, waste receptacles, and changing stations can influence how an accessible route performs after construction. Teams should verify that these elements remain within appropriate reach and operating locations while staying clear of required circulation, transfer, and maneuvering areas.
How to avoid these mistakes: Conduct a coordinated accessibility review before project closeout. Measure from finished surfaces, verify installed fixture centerlines and mounting heights, check turning and transfer areas, confirm door maneuvering space, and review accessory locations under actual field conditions. Documenting these checks before final turnover can identify correctable discrepancies before they become costly post-occupancy modifications.
Providing ADA Accessible Restrooms for Everyone
ADA compliance is code compliance—it’s accessible, usable space with thoughtful design and corporate responsibility. The most frequent errors are a result of subtle misreadings or the lack of coordination among architects, contractors, and installers.
By incorporating accessibility into the very fabric of your design, taking accurate field measurements, and verifying compliance at every stage of construction, not only do you avoid the expense of rework—but you develop restrooms equally utilized by everybody.
It’s all about the details in commercial building. And when the details result in a bathroom that’s accessible to all, what you’re left with is an area that’s not only compliant, but welcoming.
| Error Type | Common Issue | How to Prevent |
|---|---|---|
| Grab Bars | Wrong height or weak bars | Measure from finished surfaces; use ADA-rated bars |
| Toilet Clearance | Space lost to partitions or finishes | Account for wall thickness; use templates |
| Lavatories | Too high or no knee space | Use wall-mount sinks; insulate pipes |
| Mirrors/Dispensers | Mounted too high or deep | Follow reach ranges; use recessed units |
| Floors | Over-sloped or uneven | Limit slope to 1:48; use linear drains |
| Turning Space | Blocked by doors or fixtures | Design 60-inch clearance; plan door swings |
| Signage | No tactile/Braille or poor contrast | Mount tactile, high-contrast signs properly |
| Accessories | Out-of-reach dryers or racks | Use mounting schedule; verify reach range |